Halloween Sugar Cookies Decorating Ideas + Recipe
Easy Halloween Sugar Cookies Decorating Ideas
Halloween Sugar Cookies Decorating Ideas are here, and we’re bringing you a hassle-free recipe for no-chill sugar cookies that will elevate your spooky season festivities. With October in full swing, it’s time to get into the spirit of Halloween fun with these fun and easy-to-make sugar cookies.
The Halloween Sugar Cookies Decorating Ideas in this post all use buttercream. But if you’re interested in using icing for a smooth finish, you can find our favorite recipe for cookie icing in this Valentine’s Day cookie post: No Chill Easy Sugar Cookie Recipe.
Ingredients for No-Chill Cut-Out Sugar Cookies
This is my favorite sugar cookie recipe, because it comes together so easily and creates such clean shapes. It’s my one and only go-to when I’m making sugar cookies!
Here are the ingredients you’ll need:
- Butter: The cold butter provides the foundation for the cookie’s structure. As it’s mixed with the other ingredients, it creates pockets of fat that, when baked, help to create a tender and crumbly texture in the cookies.
- Sugar: Sugar not only adds sweetness but also contributes to the cookie’s texture. It helps to create a soft and chewy center while promoting browning and caramelization for a slightly crispy exterior.
- Egg: The egg acts as a binder, helping to hold the sugar cookie dough together. It also adds moisture to the cookies and contributes to their softness and richness.
- Vanilla Extract: Vanilla extract enhances the flavor of the cookies, giving them a pleasant, aromatic quality. It adds depth and complexity to the overall taste. Almond abstract is delicious in sugar cookies too.
- All-Purpose Flour: Flour is the primary dry ingredient that gives structure to the cookies. It provides the necessary gluten to hold the cookies together but not too much to make them tough. It also serves as a base for other ingredients.
- Baking Powder: Baking powder is the leavening agent in this recipe. It helps the cookies rise and become slightly puffy and tender. It gives the cookies a light and delicate texture.
- Pillsbury Vibrant Vanilla Frosting (in different colors): Used for decorating the sugar cookies, adding vibrant colors easily, and additional flavor options to your Halloween-themed cookies.
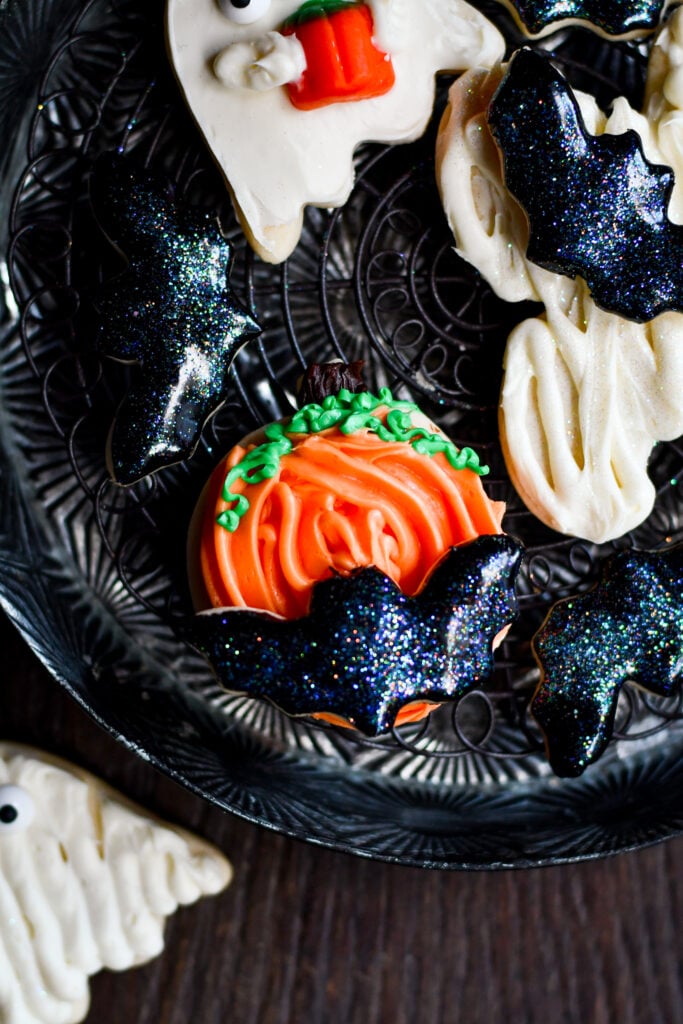
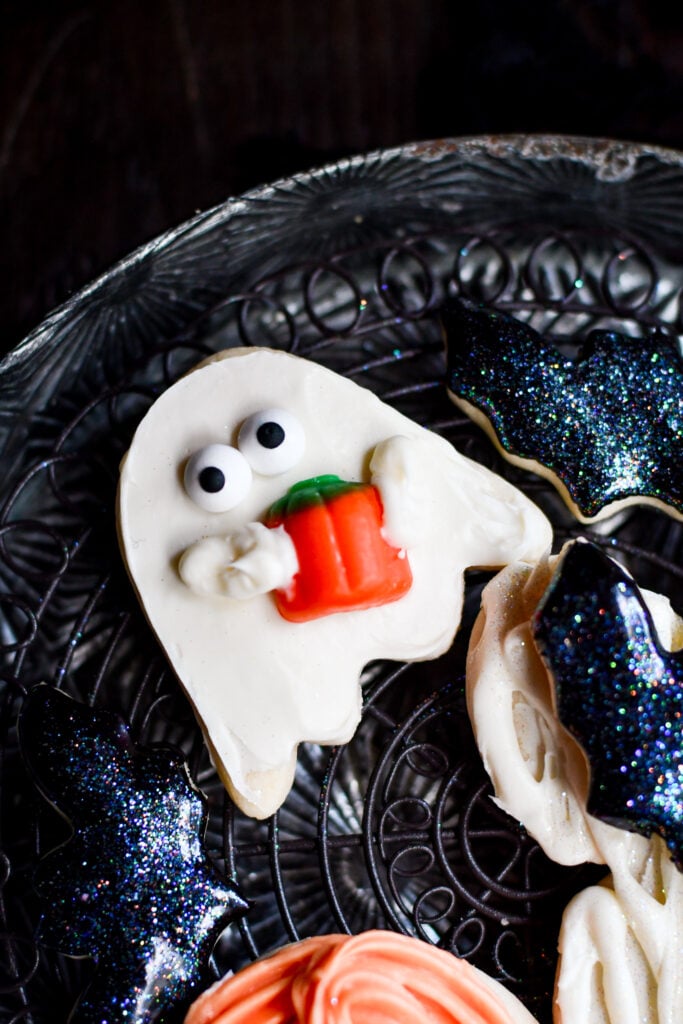
- Sprinkles and Candy: I used Candy Eyes, Candy Corn Pumpkins, and Disco Dust to decorate these cookies. But, of course, you could get creative using any kind of sprinkles!
More Halloween Recipes
Supplies for these Halloween Sugar Cookies Decorating Ideas
Halloween Cookie Cutters
These come in various fun shapes and sizes and are used to cut out the cookie dough before baking. Halloween-themed cutters can add a festive touch to your cookies. These are some of our favorite cookie cutters and the ones we used for this recipe:

Pumpkin Cookie Cutter

Miniature Bat Cookie Cutter

Gingerbread Man (Mummy)

Ghost Cookie Cutters
Rolling Pin
A rolling pin is essential for rolling out the cookie dough evenly to your desired thickness before cutting out shapes. I also think an extra large pastry mat is a great tool to have on-hand when rolling sugar cookies. Sometimes you can find the rolling pin and the pastry mat sold together as a set.
Baking Sheet
Baking sheets or cookie sheets are used to place the cookie dough on before baking. I know this one is a bit obvious, but I like to mention it so that I can tell you about my favorite Pizza Baking Sheets that I’m obsessed with for cookie-baking.
I inherited my pans from my aunt, and I can’t find the exact same ones to share with you guys. But this Stainless Steel Pizza Pan on Amazon comes pretty close.
Cooling Rack
A wire rack for cooling allows your freshly baked cookies to cool evenly and prevents them from becoming soggy on the bottom. This is really important for decorated sugar cookies, because the cookies MUST be 1000000% cooled all the way through before decorating. Having a cooling rack really speeds up the process.
Icing/Frosting
You can use royal icing, buttercream, or ready-made frosting in various colors for decorating. Pillsbury Vibrant Vanilla Frosting in green, white, black, orange, and chocolate can be a convenient option.
- You can still keep things relatively simple and easy if you choose to use an icing. I don’t use royal icing, but I do make a delicious confectioners sugar icing that comes together quickly and is a dream to work with. When I use icing, I don’t usually add a lot of detail to the decorating. I think the smooth simplicity is beautiful on it’s own (not to mention so much easier). And if you want a little more jazz, you can always add sprinkles!
- If I’m making sugar cookies to share with others or for an event, I always opt for either the icing mentioned above or go ALL OUT and make homemade buttercream. The buttercream isn’t difficult to make, but it means dividing the frosting into separate containers for coloring. Which just feels like one step too many for me on most days!
- Most often, I’m just making sugar cookies for my family or for the blog. And in that case, I prefer to use the Vibrant Vanilla colored frosting that Pillsbury makes. It’s beautiful and works more than adequately for piping (as long as you don’t hold the piping bag in your hand for too long). The black frosting* is the only one that doesn’t taste great, so I try to only use it for small accents as much as possible.
*The secret to delicious black icing or frosting is to use a dark chocolate frosting as the base. Add a little bit of black coloring at a time and allow it to develop for at least a couple of hours before going back and adding more coloring.
Piping Bags and Tips
Piping bags and piping tips allow for precise and controlled application of frosting. Different tips create different patterns and effects. Piping frosting is a necessary evil when it comes to beautifully decorated cookies, but even so I try to keep the need for multiple tips and bags to an absolute minimum.
For this particular batch of easy Halloween cookies, you’ll only need a large star tip and a medium round tip. If you have a really small round tip for the pumpkin vines and stem, that’s great. But if not, you can just snip a really small bit off the corner of a bag. It works!
You can buy each of the components individually, but it’s a much better deal to just go ahead and buy a cake decorating set. Bonus: most decorating kits will also come with an offset spatula, which makes all cake and cookie decorating much more manageable. I always keep several stocked in my kitchen. They are so handy for all sorts of things!
Tips & Tricks for Decorating Sugar Cookies with Buttercream
Here are some general tips and tricks to help you achieve best results using frosting tips:
1. Consistency is Key: Achieving the right consistency for your buttercream frosting is crucial. For outlining and piping details, use a stiffer consistency. For filling larger areas, use a slightly thinner consistency.
2. Use Piping Bags: Invest in reusable piping bags or disposable ones for easy and clean frosting application. Couplers can also be helpful for changing tips without changing bags.
3. Color Gradation: Create gradients or ombre effects by piping multiple shades of the same color onto your cookies.
4. Texture and Detail: Experiment with various tips to add texture and detail. For example, star tips can create fur or grass-like textures, while round tips are great for small dots or writing.
5. Allow Layers to Set: If you’re adding multiple layers of frosting, allow each layer to set before adding the next one. This prevents colors from bleeding and maintains clean lines.
6. Keep It Clean: Keep your work area and tools clean. Wipe the tips of the frosting tips and any excess frosting from your hands or surfaces to maintain a polished look.
7. Fix Mistakes: If you make a mistake, don’t worry! You can easily scrape off or wipe away wet frosting and start over.
8. Stiffen Frosting: If your frosting is too soft, you can add more powdered sugar to stiffen it. Conversely, a bit of milk or water can be added to thin it out if needed.
9. Patience Pays Off: Let your decorated cookies sit undisturbed until the frosting is completely dry. This can take several hours or even overnight, depending on the thickness of the frosting. And (on the flip side) be sure to store any leftover frosting in an airtight container to prevent it from drying out.
Halloween Sugar Cookie Recipe

Halloween Sugar Cookies Decorating Ideas + Recipe
Make your Halloween sweeter with these fun and spooky sugar cookie designs!
Ingredients
- 2 sticks (salted) butter, cold
- 1 c sugar
- 1 egg
- 2 tsp vanilla extract
- 3 cups all-purpose flour
- 2 tsp baking powder
Instructions
- Preheat oven to 350ºF.
- Using an electric mixer, beat together the butter and the sugar until smooth.
- Mix in the egg and vanilla. Mix in the flour and baking powder until dough forms. Use your hands to form the dough into a disc.
- On a floured surface, roll out the dough to about 1/4 inch thick and cut into shapes. Place on ungreased baking sheet and put in the freezer* for 5 minutes before baking.
- Bake for 7-10 minutes (the bottoms should be brown, and the tops should look dry but not browned at all). Let cool completely before icing.
Nutrition Information:
Yield: 24 Serving Size: 1Amount Per Serving: Calories: 93Total Fat: 0gSaturated Fat: 0gTrans Fat: 0gUnsaturated Fat: 0gCholesterol: 8mgSodium: 44mgCarbohydrates: 20gFiber: 0gSugar: 8gProtein: 2g

