Easy All Butter No Chill Pie Crust Recipe
Easy All-Butter No Chill Pie Crust Recipe
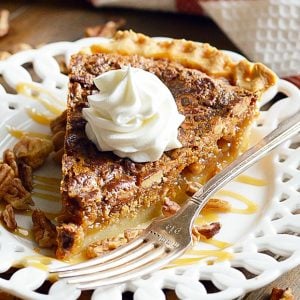
Introducing our game-changing No-Chill Pie Crust: an easy, all-butter recipe that pairs perfectly with our Butterscotch Pecan Pie, Easy Pumpkin Pie, and Fresh Strawberry Pie. This recipe yields two pie crusts, allowing you to create two pies or a stunning lattice crust masterpiece in no time.
This no-fuss, no-chill all butter pie crust recipe is a game-changer in the world of pie-making. With the same buttery, flaky goodness you love from traditional crusts but without the waiting game, this recipe will have you whipping up both sweet pies and savory pies in no time.
Try filling this perfect pie crust with our Secret Ingredient Apple Crisp recipe. It’s like eating an apple pie and an apple all crisp in one bite!
No Chill Pie Crust Recipe | Key Ingredients
- Butter: The butter is the primary fat in this recipe, and it’s what gives the pie crust its rich, buttery flavor and flaky texture. It should be cold and cubed because cold butter creates pockets of steam as it melts in the oven, which results in a tender, flaky crust.
- All-Purpose Flour: Flour provides the structure and bulk to the pie crust. It combines with the butter to form a dough, and when baked, it sets into a crispy, golden crust. All-purpose flour is used here for its versatility in pie crust recipes.
- Salt: Salt enhances the flavor of the crust and balances the sweetness of the pie filling. It also helps strengthen the gluten network in the dough, giving it some structure while still remaining tender.
- Vinegar: Vinegar is an interesting addition to this recipe. It helps tenderize the crust by inhibiting gluten formation. This results in a more tender and flaky pie crust. Additionally, it can add a slight tangy flavor.
- Ice Water: Ice water is used to bind the dough together. The cold temperature of the water helps keep the butter cold, which is essential for achieving a flaky crust. The amount of water may vary depending on humidity and other factors, so it’s added gradually until the dough comes together.
These simple ingredients work together to create a pie crust that is both flavorful and structurally sound, making it the perfect vessel for your favorite pie fillings. The cold butter, vinegar, and ice water are key components in achieving the desired flakiness and tenderness without the need for chilling the dough.
Favorite Pie Recipes
No Chill Pie Crust Recipe | Step-by-Step
Making a pie crust from scratch can be really intimidating. But once you have a feel for the whole process from start to finish and a little bit of hands-on experience, you’ll be making homemade pie crusts in your sleep! If I can do it, anyone can do it.
Here’s an overview of what you can expect each step of the way.
Mix the Dry Ingredients
Pretty straightforward– start by mixing the all-purpose flour and salt in a large bowl. This step ensures that the salt is evenly distributed throughout the dough.
Add the Cold Butter
Use Cold Butter: Start with one cup of salted butter that has been chilled in the refrigerator. The butter should be cold to the touch, and it’s typically recommended to cube it into small pieces before adding it to the dry ingredients. Cutting it into small cubes allows for even distribution throughout the flour mixture.
Importance of Cold Butter: The reason for using cold butter is to create pockets of fat in the dough. During baking, these pockets of butter melt, and the water in the butter turns into steam. This steam causes the layers of the dough to separate, resulting in the flaky, tender texture that’s so desirable in a pie crust. If the butter were to melt prematurely, you wouldn’t achieve the same effect.
Cut in the Butter:
Incorporating the Butter: Now, let’s talk about how to effectively incorporate the cold butter pieces into the flour mixture. There are a few tools and methods you can use:
- Pastry Cutter: A pastry cutter (or pastry blender) is a handy tool designed specifically for this purpose. Use it to cut the cold butter into the flour. Press down and twist the cutter through the mixture until the butter is broken down into smaller pieces. Continue until you achieve a coarse, crumbly texture with some pea-sized butter chunks remaining.
- Two Knives: If you don’t have a pastry cutter, you can use two knives. Hold one knife in each hand and cut the butter into the flour by crossing the knives over each other. This method also helps create that desirable coarse texture.
- Fingertips: Alternatively, you can use your fingertips, though this method requires a bit more care to prevent the butter from melting. Gently rub the butter and flour mixture between your fingertips, breaking the butter down into smaller pieces. Continue until you reach the desired consistency.
Aim for a Coarse Texture: The end goal when adding the cold butter is to have a mixture that resembles coarse crumbs with visible pieces of butter. These butter chunks are what will create those delightful layers in your baked crust.
Keep It Cold: Throughout the process of adding the cold butter, it’s crucial to work quickly and handle the ingredients as little as possible to maintain their chill. Cold ingredients are your allies in producing a flaky pie crust, and they help make the no-chill aspect of this recipe possible.
Add the Vinegar
The primary role of vinegar in this recipe is to act as a tenderizer for the pie crust. Vinegar is mildly acidic, and its acidity helps inhibit gluten formation when it comes into contact with the flour. Gluten is a protein in flour that, when activated, can make the crust tough and less flaky. By introducing vinegar, you’re effectively slowing down gluten development, resulting in a more tender crust.
The addition of vinegar in this no-chill pie crust recipe is a clever technique to achieve a tender and flaky crust while also adding a subtle depth of flavor. So don’t be deterred by the use of vinegar! It’s your secret weapon that enhances the quality of your homemade butter crust without compromising taste.
Side Note: Types of Vinegar
The recipe typically calls for plain white vinegar, but you can also use other mild, colorless vinegars such as apple cider vinegar. It’s important to use a vinegar that doesn’t have a strong, overpowering flavor, as the goal is to enhance the crust’s tenderness without significantly altering the taste.
Gradually Add Ice Water
The process of gradually adding ice water when making pie dough is a critical step in achieving the right texture. Let’s go into more detail about this and how to recognize when to add more water or stop:
1. Gradually Adding Ice Water:
- After incorporating the cold, cubed butter into the flour mixture, it’s time to introduce the ice water. The water should be very cold to keep the butter from melting prematurely. Using ice water ensures that the dough remains cold throughout the process.
2. Using a Fork:
- Start by adding the ice water one tablespoon at a time. A fork is an excellent tool for this job. Gently mix the water into the flour and butter mixture by stirring with the fork. Use a gentle tossing and lifting motion to evenly distribute the water without overworking the dough.
3. Assessing the Dough Texture:
- As you add the ice water, pay close attention to the texture of the dough. At first, it will appear crumbly, and the mixture will look dry. Continue to mix and add water gradually.
4. Signs You Need More Water:
- You’ll know you need more water when the dough still appears dry and doesn’t easily come together when pressed. If you try to squeeze a handful of the mixture, and it doesn’t hold its shape and crumbles apart, it’s an indicator that more water is needed.
5. Adding Water Cautiously:
- When you notice the dough is too dry, add one more tablespoon of ice water. Continue to mix gently with the fork. You should see the dough starting to clump together.
Test Dough Consistency
Keep adding water one tablespoon at a time and mixing until the dough starts to come together. You’re aiming for a point where it’s just moist enough to form a cohesive ball when you press it together with your fingers. The dough should not be overly wet or sticky (indicating you’ve added too much water).
Baking Hack: Forming a Dough Disk
Forming and Storing Pie Dough Using a Ziploc Bag
This is a nifty trick I’ve used for several years to form a pie crust easily and is hands down the best way to do it. All you need is a gallon-sized Ziploc bag!
Steps:
- Place Dough in the Bag:
- Carefully transfer your prepared pie dough into the Ziploc bag. Try to keep the dough towards one corner of the bag, leaving some empty space in the bag for manipulation.
- Seal the Bag Almost Completely:
- Seal the Ziploc bag, leaving a small opening for air to escape. This opening will allow you to push the air out and form the dough into a disc.
- Twist the Bag:
- With the bag almost completely sealed, grasp the portion with the dough in it and twist it closed. This will force the dough into one corner of the bag.
- Shape the Dough:
- While still holding the twisted portion of the bag, gently press down on the dough inside the bag. As you do this, the dough will take on the shape of the bag’s corner. Keep pressing until it forms a flat disc.
- Seal the Bag Completely:
- Once you’ve shaped the dough into a disc, seal the Ziploc bag completely to create an airtight container for the dough.
- Chill or Store:
- Depending on your needs, you can either place the sealed bag with the dough in the refrigerator to chill if you’re not ready to use it immediately, or you can proceed with rolling out the dough for your pie crust. If making a lattice crust pie, I usually leave one of the discs in the ziploc bag while I’m working on the bottom crust first.
Note:
- This method not only shapes the dough conveniently but also helps in preventing the dough from drying out in the fridge since it’s stored in an airtight bag.
- When you’re ready to use the dough, simply remove it from the bag, and it should be in perfect disc form, ready for rolling.
This hack offers both a practical way to shape your pie dough and a handy storage solution, making your pie-making process even more efficient ☺
Homemade Pie Crust Recipe | Baking Instructions (3 Ways)
Baking the Pie Crust Filled
Ingredients:
- Prepared no-chill pie crust
- Your choice of pie filling
Steps:
- Prepare the Pie Filling
- Depending on your recipe, prepare your pie filling separately.
- Roll Out the Pie Crust
- Roll out the prepared no-chill pie crust on a lightly floured work surface to the desired size to fit your pie pan. Be sure to use enough flour to prevent sticking.
- Transfer the Crust
- Carefully lift the rolled-out crust and place it into your pie pan. Press it gently into the pan, ensuring there are no air pockets between the crust and the pan.
- Fill the Pie
- Bake According to Pie Recipe
- Follow the specific instructions for baking your filled pie. Baking times and temperatures can vary widely depending on the type of pie you’re making. Usually, it involves baking until the filling is set and the crust is golden brown.
- Cool and Serve:
- Once your pie is done baking, allow it to cool on a wire rack for a while before slicing and serving.
Baking the Pie Crust Blind (Pre-baking):
Ingredients:
- Prepared no-chill pie crust
- Pie weights or dried beans (for weighing down the crust)
Steps:
- Roll Out the Pie Crust:
- Roll out the prepared no-chill pie crust on a lightly floured surface to the desired size to fit your pie pan.
- Transfer the Crust:
- Carefully lift the rolled-out crust and place it into your pie pan. Press it gently into the pan, ensuring there are no air pockets between the crust and the pan.
- Prick the Crust:
- To prevent the crust from puffing up during blind baking, use a fork to prick the bottom and sides of the crust. This allows steam to escape.
- Preheat the Oven:
- Preheat your oven to 375°F (190°C).
- Line with Pie Weights or Beans:
- To keep the crust from bubbling up while it bakes, line it with parchment paper or aluminum foil and fill it with pie weights or dried beans. This will weigh down the crust.
- Blind Bake:
- Place the pie crust in the preheated oven and bake for about 15-20 minutes or until the edges are lightly golden.
- Remove Weights and Continue Baking:
- Carefully remove the parchment paper and weights. Return the crust to the oven and bake for an additional 5-10 minutes or until the bottom is golden brown and fully cooked.
Freezing the Pie Crust for Later Use
Ingredients:
- Prepared no-chill pie crust
Steps:
- Prepare the Crust:
- Roll out the prepared no-chill pie crust as usual into the desired shape.
- Shape for Freezing:
- If you plan to use the crust later, you can either freeze it in the pie pan or as a disc. If using a pie pan, press the crust into the pan and shape the edges. If freezing as a disc, you can follow the Ziploc bag method mentioned earlier.
- Wrap and Seal:
- Regardless of your choice, wrap the crust tightly with plastic wrap or aluminum foil to prevent freezer burn and moisture loss. Seal it securely.
- Label and Date:
- It’s a good practice to label the wrapped crust with the date of preparation for easy identification later.
- Freeze:
- Place the wrapped crust in the freezer. It can be stored for up to 2-3 months.
- Thaw Before Use:
- When you’re ready to use the frozen pie crust, simply remove it from the freezer and let it thaw in the refrigerator for several hours or overnight before filling and baking.

Classic Pie Crust Recipe
Discover fuss-free pie perfection with our no chill pie crust recipe. Make two buttery, flaky pie crusts effortlessly.
Ingredients
- 1 cup salted butter, chilled and cubed
- 2 1/2 cups all-purpose flour
- 1/2 tsp salt
- 1 tbsp vinegar
- 5-7 tbsp ice water
Instructions
- Cut the butter into the flour and salt (see my tips below in this post). Make sure to leave large chunks of butter (larger chunks than you would think-- I promise it helps).
- Add 1 tablespoon of vinegar and 1 tablespoon of ice water. Use a fork fork to toss the mixture together.
- Continue to add 1 tablespoon at a time of ice water, mixing with a fork in between each addition. The goal is not to have a smooth cohesive dough. Instead, you want to add just enough water for the dough to be sticky enough to hold together. The dough should be lumpy and ugly.
- Divide the dough into two equal portions.
- For each portion... gently pat the dough out into a thick disc. Use your fingers to press together any cracks in the dough.
- Roll the dough out to be about 1/4 inch thick. Transfer the dough to a 9-inch deep dish pie dish.
- Add the filling. Top with the second crust, and be sure to cut slits in the top to release the steam during baking. Alternatively, cut strips to form a lattice.
- Bake according to the pie recipe directions.
Nutrition Information:
Yield: 8 Serving Size: 1Amount Per Serving: Calories: 346Total Fat: 23gSaturated Fat: 15gTrans Fat: 1gUnsaturated Fat: 7gCholesterol: 61mgSodium: 331mgCarbohydrates: 30gFiber: 1gSugar: 0gProtein: 4g


